![derivita-logowhite (2).png]](https://support.derivita.com/hs-fs/hubfs/derivita-logowhite%20(2).png?height=25&name=derivita-logowhite%20(2).png)
How to Create a PLC and Add Members
To Create a PLC:
- Click into Derivita’s Assignment Assembly from your LMS.
- Click on the PLC row in the Assignment Assembly menu.
- Click “Create New PLC” and name your PLC. Pro Tip: Since you can create/join multiple PLCs, name your PLC with your school name, grade level or subject, and school year for easy identification
- The PLC will appear on the left as a PLC folder
- Once the PLC is created, copy the join code that is generated and give it to your peers so they can join.
To Join a PLC:
- Click into Derivita’s Assignment Assembly from your LMS.
- Click on the PLC row in the Assignment Assembly menu.
- Get the join code from someone already in the PLC
- Type the join code into the “PLC Join Code” box
- The PLC will appear on the left as a PLC folder
How to Create and Insert PLC Assessments
To Add an Assignment to a PLC:
- Pick the questions you want in the PLC assignment, or assignment bank.
- When you have selected the questions you like, click next.
- Name the assignment. Pro Tip: If you are using the PLC feature for sharing banks of questions, name the assignment with the word “Bank” or “Pool” in the title, so it is clear that those questions are not for formative assessments
- Toggle on “Add to PLC” and then click next. (If you are in more than one PLC, select the correct PLC in the pop-up).
- The assignment will simultaneously go to your LMS and be stored in the PLC folder for the rest of your PLC members to access.
- From your LMS, go into Assignment Assembly.
- Open up the PLC folder, then click the arrow on your PLC to open the folder and see assignments currently in the PLC.
- Click on the assignment you are looking for. If it is a CFA or Quiz, click “Insert Assessment”. This adds the whole assignment to your course as-is, so your results can be compared with other teachers.
- If, on the other hand, you don't need to compare data, and you just want to use an assessment in your PLC as a jumping-off point, click "Select Questions". Then you'll be able to select which questions you want to use, add more, rearrange them, change the point values, etc. This process treats the questions pulled from the bank as a regular Derivita Assignment.
- Pro Tip: Clicking “Select Questions” means that the data from this assignment will not flow into the PLC Analytics. If you do want data to flow into the PLC Analytics, make sure you choose “Insert Assessment”.
PLC Assignment Settings:
- Once your PLC assignment is in your LMS, each PLC member can customize the settings. If it is an assessment, we recommend you discuss and agree as a PLC what assessment settings you will use in your courses (Quiz or Exam, calculator settings, number of attempts, etc). If you do not change the settings, they will stay at the default homework settings.
- Pro Tip: If you are the one who created the assignment in the PLC, then the settings you set will transfer to the rest of the PLC members. However, if you change your settings after other PLC members have already pulled the assignment into their LMS, then your new settings do not transfer. Best practice is editing the settings right after you add the assignment to your LMS.
How to Manage PLCs and Assessments
You can right-click your PLC to rename or delete it. You can also right-click an assessment to rename it, add a description, or delete it. This is particularly helpful for clearing out assessments that have been superceded by newer versions, as well as for making it clear to other PLC members which assessments to use.
If you delete a PLC or assessment, it's permanently removed from view, but nothing will change about the assessments you've already added to your course, and your data will remain the same.
How to Access PLC Analytics
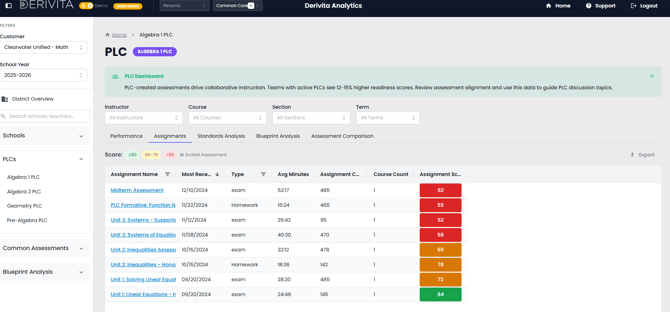
- Open Derivita Analytics (Pro tip: bookmark this page!)
- On the left, click PLCs, then select the name of your PLC.
- You will then find all of your PLCs data automatically aggregated for you.